molecular renders
Introduction
The images on the home page of this website and the one above this text were rendered by me using PDB molecular structures in Blender. I figure I’d write up a quick tutorial for the sake of having more content.
Required software
Here I generated a gallery of GIFs showing the step by step process from start to finish to generate the render at the top of this page.
Molecular Render tutorial
Gif numbers (1-16) are listed as separate steps below with more information. If you want to pause them, rewind, or zoom in, you can click on the widget and it should bring you to the Imgur gallery.
Get a molecular structure into Blender
1. Download a PDB structure
- From PDB download a .pdb or “Biological Assembly” molecule. I think the “Biological Assembly” format sometimes includes additional complexed molecules (such as DNA or RNA). For this tutorial I downloaded transcription factors OCT4 and SOX2 bound to DNA.
2. Use ChimeraX to convert the structure into glb format
- Open ChimeraX and then the molecule we downloaded. In “Molecule Display” tab hide atoms and cartoons and show surfaces. Then in the command line at the bottom of the program type the following commands to save the surface structure as glb.
cd [directory of your choice]
save [file].glb
3. Import the glb structure in Blender
Open Blender and go to File > Import > gITF 2.0 (.glb/.gltf) then select your glb formatted molecule.
Set up the viewport
4. Scale down the molecule
- Select all molecules imported by going to the “Outliner” window on the top right. Right click the imported molecule and select “Select Hierarchy” to ensure all are selected.
- Use “S” to scale the molecule down.
5. Set the stage.
- Remove the default cube by selected and pressing “Del”.
- On the top left of the viewport window select “Add” > “Mesh” > “Plane”
- Scale the plane to a large enough size that it will take up the whole camera angle.
- With the plane selected, go to “Edit” mode and select the three verteces and use “E” to extrude them further.
- Drag the extruded vertexes back and upwards. -Select the modifier tab for the plane (the blue wrench) and add a “Subdivision Surface” modifier. -Set the Levels viewport to 3 (to make it look a bit smoother as we work, but it doesn’t really matter). Set the render levels to 6 to really smooth it for our final render.
6. Set up the light.
- Select the light element and move it by pressing “G”. To move it in just the X, Y, or Z, plane use “G” then “X”,”Y”,”Z” respectively.
I think putting the light directly behind the molecule looks really cool.
- Also take the time now to set up the size (S), rotation (R) and position (G) of the molecule.
You can check the position of the molecule in the render by pressing the old timey looking film camera button on the right or top of the viewport. This puts you in the camera’s perspective.
Add some surface fascinators
At this point I’m using the geometry nodes tutorial by the BlenderGuru (link here). So I’ll be a bit briefer in my descriptions. These surface bubbles aren’t necessary, but I think they interact with the light and the translucent material in fun ways.
7. Initiate geometry nodes.
- On the bottom left, press the clock looking button to switch to “Geometry Node Editor” and expand the window. Select a molecule and press “New” to initiate geometry nodes.
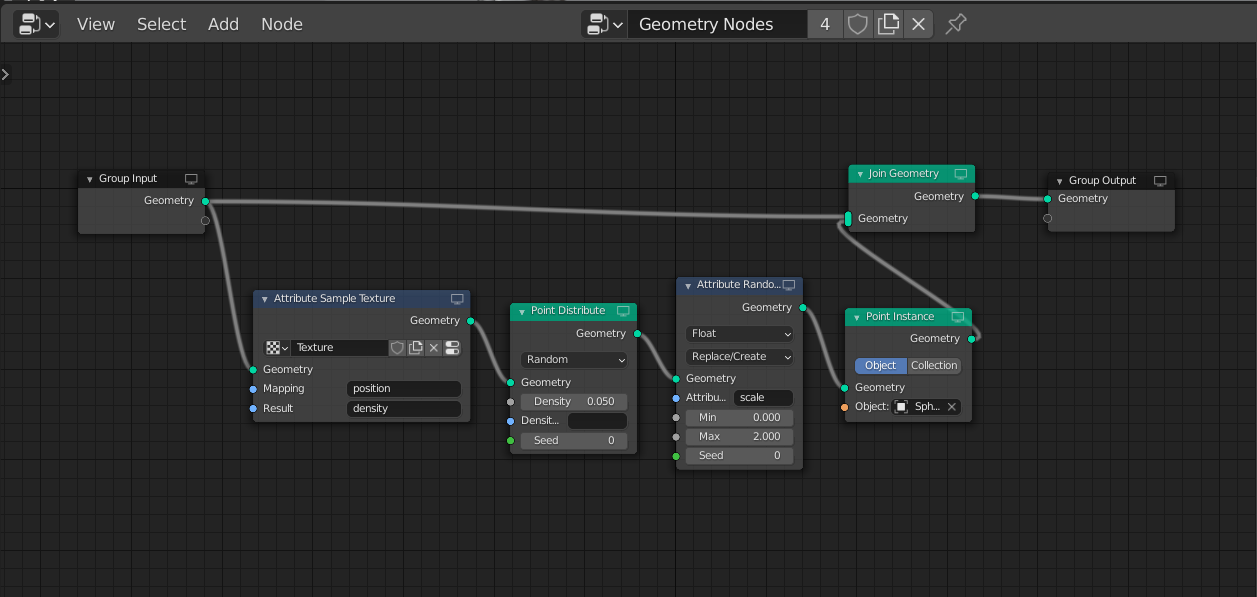
8. Add nodes.
- Use “Shift+A” to add new nodes. From there use the search function to add nodes and connections until the geometry nodes looks like the picture below.
9. Set up a master bubble.
- In the object viewport, press “Add” > “Mesh” > “UV Sphere”
- Move the sphere with “G” to get it out of the way for the render.
- Add a “Subdivision Surface” modifier to the sphere as well to ensure we get smooth bubbles. Set the render levels to 6.
- In the “Point Instance” geometry node, press the Object eyedropper to select the sphere.
10. Use texture to unevenly distribute the bubbles.
- Modify the texture that determines the position of the bubbles along the molecules. Press the right most button next to the texture selector in the Attribute Sample Texture geometry node to see the texture to be modified in the right panel.
- Set type to “Clouds” and then play with “Size” and “Contrast” settings until you find a dispersal pattern that you like.
11. Apply geometry nodes to other molecules.
- To copy the geometry node you set up for a single molecule, just press on a new one, press “New” to initiate geometry nodes for that object, and then assign the same geometry node to the newly selected object.
Adding material properties
Now to some material properties to the objects for the render. Again, I am pretty much copying the materials set up by the BlenderGuru in this tutorial . He uses it for generating gum drops, but I think it looks like a sea glass when applied to molecules.
12. Add a shader to the bubble.
- Using the same button that we used to access the geometry nodes, we will switch that panel to the Shader Editor.
- Select the sphere, initialize the shader, and adjust it to these settings.

13. Add a shader to the molecules.
- Now do the same for the molecules, adjusting them to these settings.

14. Copy the shader across molecules
- Copy the shader set up across molecules the same way we did the geometry node copying.
- After this, you can break the copy from its parent by pressing the number next to the node name on the top of the panel.
- Following this, you can adjust the molecule colors individually. I tend to use low saturation colors (<0.2). Colors can be adjusted in “Refraction BSDF”, “Glossy BSDF” and “RGB” Shader nodes.
Final rendering
Finally lets snap a pic!
15. Adjust around the molecule and light for final render
- Take one last chance to move the molecules around while in camera view to get a dope render.
16. Render
- Click on the “Render properties” tab on the right panel and set the Render engine to “Cycles”
- Under “Denoising” check the “Render” box for NLM
- Finally press “F12” key to render and watch that sucka cook.
Here’s my final result on OCT4 and SOX2 bound to DNA, I kept the molecule near the floor to get a good shadowing effect.
